One can find it a fulfilling activity at home to erect a ceramic tile bathroom wall. It enhances the appearance of your bathroom, and provides long term impact and water resistance. This is something economical in the long run. This tutorial can help even when doing a complete makeover of an old bathroom or planning a new bathroom wall using ceramic tiles. It holds the ability to add practicality and beauty in your bathroom and add value to the bathroom.
Reasons to Pick Ceramic Tiles for Bathroom Walls
Bathrooms can be easily furnished using ceramic tiles which possess awesome features. They are resistant to water, ease of cleaning them and have flexible designs. When you select top grade ceramic tile of reputable brands such as Face Impex, you are essentially selecting materials that survive and satisfy moist conditions.
Ceramic tiles’ demand for bathroom walls is increasing day by day. These tiles withstand continuous steam, moisture and water splashing and retaining their appearance like new. They also come in different hues, sizes and design as you wish to craft a style that suits your taste.
Important Tools and Supplies
You should prepare your own tools and materials before you begin to work on your ceramic tile bathroom wall. Preparing everything beforehand is the way to make the job easy to complete and to make the outcome more professional.
Tools You’ll Need:
- Wet saw or tile cutter
- Notched trowel ( choose one 3/16 or 1/4 in)
- There are two levels (2 and 4-foot)
- Rubber float
- Sponges for grout
- Tape measure
- Chalk line
- Tile spacers
- Safety gear like gloves and glasses
- Bucket for mixing tile adhesive
Materials You’ll Need:
- Buy high-quality ceramic tiles and add 10% more to the total for cutting and breakage.
- Get tile adhesive made for bathroom use.
- Work with the same grout as your gaps in between tiles.
- Protect your grout with a grout sealer.
- Pick tile trim or bullnose pieces for the edges.
- Apply a waterproof primer or sealer before tiling.
When you choose ceramic tiles Face Impex has variety of bathroom designs. Their tiles balance design and durability to help make your bathroom walls appealing and long-lasting.
Step 1: Prepare the Wall Surface
To install ceramic tiles , you need to prep the wall first. Take off old tiles, wallpaper, or paint. Ensure the wall is clean dry, and built to hold the tiles .
Look at the wall to look for any cracks, holes or bumps. Small holes are filled with spackling paste, and sanded smooth when dry. You may require a slight spreading of the joint compound so as to smooth the wall in order to rectify large defects. Prepping well here affects how good your ceramic tile bathroom wall will look so put in the effort to get it right.
Cover the entire wall with a waterproof primer or sealer. Focus on the spots near the shower, tub, and sink where water is a bigger problem. Let the primer dry all the way following what the product directions say, before you move on.
Step 2: Map Out Your Tile Arrangement
To install ceramic tiles on a bathroom wall , you need good preparation. Begin by locating the center of your wall and use a chalk line to mark it. It is a good line that makes your pattern of the tiles to appear orderly and symmetrical.
Measure the dimensions of your tiles and figure out how many full ones will fit across the wall’s width. If the edges will need partial tiles, shift your starting point to ensure the cuts on both sides match. Tile set out in position a few without the adhesive say advisors at Face impex. This technique informs you just what your layout will certainly appear like when done.
If the wall has fixtures or obstacles, make a detailed layout to manage tricky cuts around things like outlets, switches, or pipes. note these areas on the wall to make cutting easier later.
Step 3: Spread the Tile Adhesive
Grab your notched trowel and spread some adhesive on a section of the wall about 3 feet by 3 feet. Keep the trowel at a 45-degree angle, and make even ridges in the adhesive as you go. Remain with small portions to prevent the adhesive to dry prior sticking it on the tiles.
Getting the adhesive right is super important to make the bathroom wall look professional. If you spread too little, tiles won’t stick well. If you use too much, they might slide or end up uneven. Face Impex suggests picking a top-quality adhesive made for bathrooms that gives great water resistance and strong bonding.
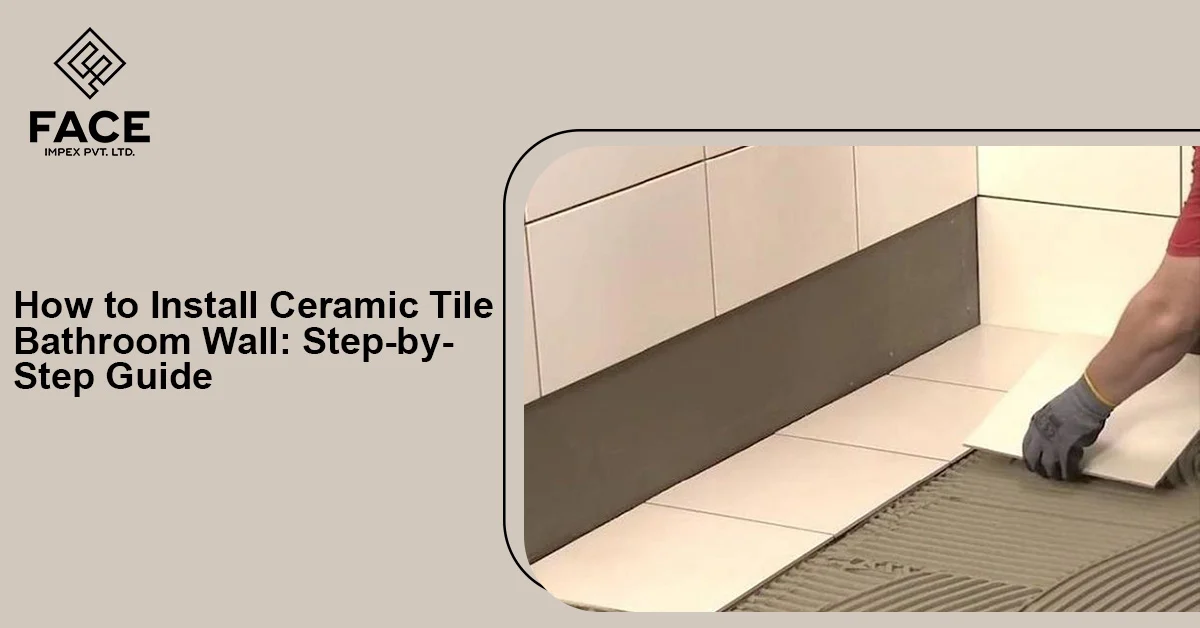
Step 4: Start Placing Your Ceramic Tiles
Start placing tiles along the center line you marked earlier then move outward toward the edges. Push each tile down into the adhesive using a gentle twisting motion so the tile sticks well. Put tile spacers between each one to keep the gaps even.
Check each tile with a level to make sure it lines up straight and . Wipe off extra adhesive from the tiles and grout lines right away with a wet sponge. Do a step back every now and then to view what it would look like and make sure that your tiles are straight in their places and without uneven gaps.
When you need to cut tiles for tricky spots, measure and grab the right tools for the job. If you’re cutting around pipes or odd shapes, a tile nipper or angle grinder works great to get precise cuts.
Step 5: Focus on Corners and Edges Next
The edges and the corners are the parts where you should aim at a professional and clean-looking bathroom wall made of ceramic tiles. Use bullnose tiles or trim pieces along edges that are exposed. These pieces not give a polished look but also help keep tile edges safe from chips and moisture.
For inside corners, push tiles against each other. Rather than grout, base sealing of the joint with caulk. When it comes to outside corners, it is possible to prepare corner trim pieces previously (paying the extra cost involved) or cut the tiles at an angle to create a finished and polished look.
Step 6: Grouting Process
Let the tiles on your bathroom wall cure for at least 24 hours before you grout. Take out all spacers and clean off any leftover adhesive sitting in the grout lines.
Mix the grout by following the instructions given by the manufacturer. mix as much as you can finish in half an hour. Spread the grout over the tiles using a rubber float. Push down to ensure every joint is filled. Wipe away extra grout with a diagonal motion but avoid dragging it out of the joints.
Use a damp sponge to clean the tiles. Rinse the sponge often using clean water. Face Impex highlights how crucial it is to install grout , as it creates the water seal that defends the structure of your walls.
Step 7: Final Cleaning and Sealing
You should wait 24 or 48 hours and let the grout cure. Do a final cleaning of the ceramic tile wall. Wash any remaining haze out of the grout with a soft cloth or a grout haze remover.
Use the grout sealer as the product instructions recommend. This step helps guard against moisture and stains. It also keeps your ceramic tile bathroom wall looking good and working well for many years.
Tips to Maintain It Longer
When your ceramic tile wall on the bathroom is installed correctly, it becomes simple to maintain. Clean it using mild and PH-neutral cleaners, which assist in making the tiles very clean. Avoid aggressive cleaners that can damage the tiles and cause the grout to get out of order.
Inspect the grout lines on yearly basis and reapply the sealer when it is necessary. Repair cracked grout or any grout that goes missing immediately to prevent water wrecking havoc behind the tiles. Customers of Face Impex often share how their tiles stay in excellent shape for decades when they follow these simple care routines.
Wrap-Up
Installing ceramic tile walls for your bathroom is a very achievable DIY project that can totally impact on the look and functionality of the room. This guide walks you through step by step and shows you how to incorporate high-quality tiles from trusted suppliers like Face Impex to make a durable and sleek wall that will stay for years.
Staying patient and focusing on the small details play a major role in getting the best results. Each step matters so line up the tiles , make sure they stick , and finish the edges . Invest your time with a booming ram gallons of distinct style which makes life your living room easier and boost your home with price.
Whether this is your first try at tiling or you’re adding to your DIY accomplishments, this guide covers what you need to know to tile your bathroom wall like a pro.